 how-to
How to Prepare Ground for Metal Carport: 7 Steps
Table of Contents
- Why Ground Preparation Matters for Your Metal Carport
- Step 1: Check Local Permits and Utility Lines
- Step 2: Measure Your Site and Choose the Location
- Step 3: Clear the Area of Vegetation and Debris
- Step 4: How to Level Ground for Carport Installation
- Metal Carport Foundation Types: Choosing the Right Base
- Anchoring Metal Carports to Dirt and Other Surfaces
- Final Site Inspection and Maintenance Tips
- Frequently Asked Questions
Last Updated: September 8, 2026
Why Ground Preparation Matters for Your Metal Carport
A metal carport is only as stable as the ground beneath it. Skipping proper site preparation is the most common reason structures shift, doors bind, and anchor points pull loose, which is why you must prepare ground correctly before anything else. Ground preparation creates a flat, compact, well-drained surface that distributes weight evenly and gives anchors something solid to grip.
Below are the seven steps that turn raw dirt into a proper foundation. The process is straightforward enough for a weekend project, but it demands attention to detail. Treat the ground as a structural component.
Step 1: Check Local Permits and Utility Lines
Before you move a single shovel of dirt, call your local building department. Many jurisdictions require permits for structures over a certain size, even temporary-looking metal buildings. The permitting process typically involves submitting engineered drawings, which is why local zoning regulations and building permit requirements vary so widely from county to county.
Dial 811 before you dig, the national call-before-you-dig hotline. They will mark gas lines, water pipes, and electrical conduits on your property at no charge. Hitting a utility line is dangerous and can halt your project for weeks while repairs are made.
Ask your building department about setback requirements and property line distances. Most municipalities enforce minimum distances between structures and lot boundaries. The carport manufacturer can provide engineered drawings to submit with your permit application.
Step 2: Measure Your Site and Choose the Location
Confirm the actual footprint of your carport and add at least 2 feet of working space on every side, more if you need room to walk around for maintenance or anchoring. Observe how water flows during a rainstorm. Low spots that collect standing water will undermine your foundation over time, while high spots may require significant excavation. Choose the flattest, highest ground available, even if it means walking farther from your house.
Check for overhead obstacles like tree branches, power lines, or roof overhangs that could interfere with delivery or installation. Confirm the delivery truck can access the site, accounting for gates, fences, and narrow driveways.
Step 3: Clear the Area of Vegetation and Debris
Vegetation is the enemy of a stable foundation. Grass, roots, and organic matter decompose over time, creating voids that cause uneven settling. Remove all topsoil, grass, roots, and organic material down to mineral soil, typically 4 to 6 inches deep across the entire footprint.
Clear rocks larger than a few inches, old construction materials, and any buried waste you uncover. Large rocks create point loads that can crack a slab or shift a dirt base. Smaller gravel and stone can stay, as they improve drainage and compaction.
Use a sod cutter for grass areas rather than a shovel, which leaves root systems behind. For larger sites, a rented skid steer or box blade makes short work of the job. Cut back any overhanging branches that could drop debris on your roof or scrape panels during high winds.
Step 4: How to Level Ground for Carport Installation
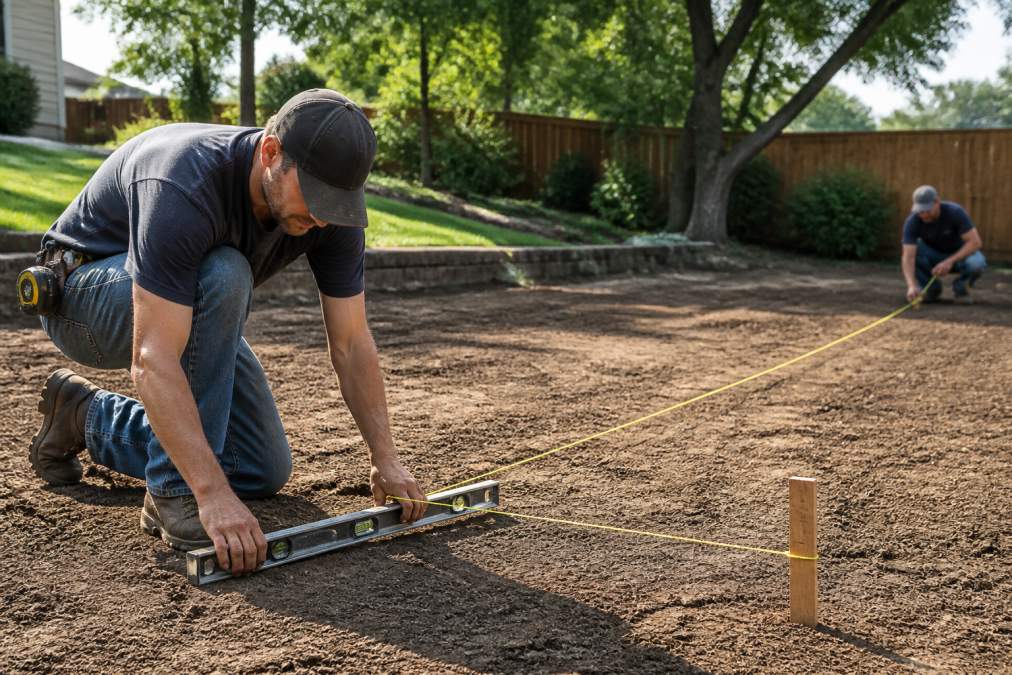
Leveling is where most DIY installations go wrong, but you can prepare ground effectively by aiming not for a perfectly flat surface, but one that slopes slightly, about 1 inch per 10 feet, to direct water away from the structure. Achieving this requires a systematic approach rather than eyeballing it.
Step 1: Stake out the perimeter. Drive marking stakes at each corner of your footprint and use string lines to define the exact edges.
Step 2: Establish a reference line. Tie a string line across the highest point of the site and attach a bubble level to it. Measure down from the string at regular intervals to identify high spots that need excavation and low spots that need fill.
Step 3: Excavate the high spots. Use a shovel or rented equipment to cut down high areas to match your reference elevation. Do not fill low spots first, as you will simply move the problem around. Cut the high ground down to the target slope, then address the lows.
Step 4: Fill low spots in thin layers. Add fill material in 2 to 3 inch lifts, compacting each layer before adding the next. Filling all at once leaves air pockets that settle later. For most installations, crushed stone or 57 stone works well because it drains and compacts to a dense, stable base.
Step 5: Compact thoroughly. Rent a plate compactor and make overlapping passes across the entire footprint. Proper compaction prevents future settling. A hand tamper works for small areas, but a mechanical compactor is worth the rental fee for anything larger than a single-car footprint.
Soil compaction guidance and best practices from the USDA Natural Resources Conservation Service emphasizes that proper moisture content is critical during compaction. Soil that is too dry won't densify, and soil that is too wet becomes unstable. The soil should hold together when squeezed but crumble when dropped.
Metal Carport Foundation Types: Choosing the Right Base
The foundation type you choose depends on your soil conditions, local climate, and budget. The three most common metal carport foundation types are compacted gravel, concrete slab, and concrete piers. The real differentiator isn't just the material, it's how each system manages water. Moisture is the primary enemy of a steel structure, and the ground prep you do now must actively route water away from the base to prevent rust and frost heave. preventing driveway damage.
Compacted gravel is the most popular choice for residential carports. A 4 to 6 inch layer of crushed stone (typically #57 stone, which has no fines and allows water to flow through) provides excellent drainage and a stable base. The key is the geotextile fabric layer beneath the gravel, which prevents fine soil particles from migrating upward into the stone and clogging the voids. Without it, your gravel base will slowly turn into mud. This option works well in most soil types but requires a slight crown or slope (1 inch per 10 feet) to shed water away from the center of the footprint.
Concrete slab offers the most stable, permanent foundation. A 4 inch reinforced slab (with rebar or wire mesh) distributes weight evenly and provides a clean, finished floor. The critical detail is the vapor barrier: a 6-mil polyethylene sheet laid over the compacted sub-base prevents ground moisture from wicking up through the concrete and corroding the base plates. Ensure the slab is poured with a troweled finish that slopes at least 1/4 inch per foot toward a drain or the exterior edge. Standing water will eventually find its way into anchor bolt holes and start the rust process from the inside out.
Concrete piers are the best choice for uneven terrain or areas with poor drainage. Piers are poured below the frost line (typically 12 to 48 inches deep, depending on your region) at each anchor point, lifting the frame above the ground. This leaves the area underneath open, suiting agricultural applications where you need to park equipment on natural ground. Piers can help reduce ground-contact corrosion, but they require a different drainage strategy. The grade around each pier must slope away to prevent water from pooling at the concrete column, which can cause frost heave that pushes the pier upward over multiple freeze-thaw cycles.
| Foundation Type | Best For | Drainage Mechanism | Frost Heave Risk | Installation Time |
|---|---|---|---|---|
| Compacted gravel | Most residential uses | Geotextile fabric + #57 stone voids | Low (if crowned) | 1-2 days |
| Concrete slab | Workshops, heavy use | Vapor barrier + slab slope | Low (if below frost line) | 3-5 days incl. curing |
| Concrete piers | Uneven terrain, ag use | Open air + sloped grade at each pier | Moderate (if piers not deep enough) | 2-3 days |
For sites with high water tables or poor percolation, consider a French drain system around the perimeter. This involves a 4-inch perforated pipe in a gravel-filled trench that redirects subsurface water away from the footprint. It is the single most effective way to prevent the ground from becoming saturated and destabilizing your anchors.
Anchoring Metal Carports to Dirt and Other Surfaces
Anchoring is the critical step that keeps your carport from becoming a kite in high winds. The method you use depends on your foundation type and local wind load requirements. FEMA guidance on protecting structures from high winds emphasizes that anchor systems must be matched to the specific wind loads of your region.
For gravel bases, ground augers are the standard solution. These screw into the soil to a depth of 3 to 4 feet and attach to the frame with brackets. They work well in most soil types but require enough clear soil around each anchor point to drive the auger.
Concrete anchors are used when your carport sits on a slab. Expansion bolts or wedge anchors are drilled into the cured concrete and bolted to the frame's base plates. This provides a strong connection and is required in some high-wind zones.
Mobile home anchors or earth anchors work for dirt installations without a gravel base. These are driven into the ground at an angle and expand to resist pull-out forces. They work where augers cannot penetrate rocky soil.
Final Site Inspection and Maintenance Tips
Before installation day, walk the site one final time. Verify the surface is level within your tolerance, typically 1 inch across the full footprint. Check that all vegetation is cleared at least 2 feet beyond the structure edges and that anchor points will have clear access for installation equipment. This pre-install inspection is your last chance to correct grading errors before the structure goes up.
Once the carport is installed, ground maintenance is seasonal. The ground beneath and around your structure is a living system that shifts with weather, temperature, and time. Here is a maintenance checklist that goes beyond the standard 'tighten the bolts' advice:
Quarterly Drainage Check
- After a heavy rain, walk the perimeter and look for standing water. If you see puddles within 2 feet of the base, the grade has settled and needs corrective fill. Add compacted gravel to low spots rather than dirt, which will wash away again.
- Inspect the geotextile fabric edges if you used a gravel base. If exposed, cover the fabric with stone to prevent UV degradation and weed intrusion.
- Check that downspouts or gutter discharge from nearby structures is not directed toward the carport footprint.
Semi-Annual Anchor Inspection
- For ground augers, check the torque on the bracket bolts. A loose auger will wobble in the soil, widening the hole and reducing pull-out resistance. If you notice movement, drive the auger deeper or replace it with a longer model.
- For concrete anchors, check for rust staining around the bolt heads. This indicates moisture is migrating through the concrete. Seal any cracks in the slab with a polyurethane concrete crack filler to stop water from reaching the anchor's embedded portion.
- For earth anchors, verify the soil around the anchor point has not eroded. If you see a depression forming, add compacted fill to restore the ground level.
Annual Grading Refresh
- Over time, freeze-thaw cycles and heavy rain will slowly flatten your slope. Once a year, use a rake and a level to check that the 1-inch-per-10-feet slope is still directing water away. Add gravel to any area that has settled.
- Trim vegetation back to at least 3 feet from the structure. Grass and weeds trap moisture against the base panels, accelerating corrosion. A gravel border around the perimeter is the easiest way to suppress growth and keep the base dry.
General guidance on maintaining steel buildings and preventing corrosion notes that most rust issues in metal structures begin where the frame contacts the ground. Keeping the base area dry and free of debris is the single most effective way to extend the life of your investment. The ground is not a static platform, it is a dynamic component that requires the same attention as the structure itself.
Ground preparation is not glamorous work, but it is important for the longevity of your carport. Investing time to do it right can contribute to decades of reliable service. If you have questions about site requirements for your specific structure, the team at Metal Carport Depot LLC can advise on what your ground needs before installation day arrives.
Frequently Asked Questions
How level does the ground need to be for a metal carport?
A general rule is a tolerance of about 1 inch of slope across the entire footprint. This prevents uneven stress on the frame and ensures the panels align correctly. Use a string line and a bubble level to check for high and low spots. While a perfectly flat surface is ideal, a slight slope can be managed by the installation crew. They may need to add shims or adjust the anchoring method. For the most reliable result, aim for a surface that is as close to level as possible before the crew arrives.
What is the best foundation type for a metal carport?
A concrete slab is a durable and low-maintenance foundation, especially if you plan to enclose the carport later. A gravel base made of crushed stone, such as 57 stone, is a popular and cost-effective choice that provides excellent drainage. For anchoring metal carports to dirt directly, you can use auger anchors or drive stakes, but this option may not meet local building codes. Your choice should depend on your soil type, local climate, and whether you need a permanent structure.
Can you install a metal carport on grass or dirt?
Yes, you can install a metal carport directly on grass or dirt, but it isn't recommended for long-term stability. Grass and topsoil are organic and will decompose, causing the ground to settle unevenly. This can lead to your carport frame twisting or becoming unlevel over time. For a temporary setup, anchoring metal carports to dirt with stakes may suffice. For a permanent structure, you should clear the grass and topsoil, then level and compact the subsoil before installing.
What are the site clearance requirements for a metal carport?
You should allow for at least 2 feet of clearance around the carport's footprint on all sides. This extra space gives the installation crew room to work and allows for future maintenance access. Check for overhead obstructions like tree branches that could fall and damage the roof, and ensure there is enough clearance for the height of the carport. Also, consider the swing of doors if you are adding end panels, and make sure the site is accessible for the delivery truck.