 how-to
How to Insulate Metal Building Kits: Step-by-Step Guide
Table of Contents
- Step 1: What You'll Need Before You Insulate Metal Building Kits
- Step 2: Best Insulation for Metal Buildings: Comparing Your Options
- Step 3: Installing Furring Strips and Framing for Insulation
- Step 4: Metal Building Vapor Barrier Requirements You Can't Skip
- Step 5: DIY Spray Foam Insulation Kits: What Works and What Doesn't
- Step 6: Retrofitting Insulation Without Removing Siding
- Step 7: Common Mistakes to Avoid When You Insulate Metal Building Kits
- Conclusion: Planning Insulation Around Your Building Kit
- Frequently Asked Questions
Last Updated: October 4, 2026
Step 1: What You'll Need Before You Insulate Metal Building Kits
Knowing how to insulate metal building kits starts with understanding that steel frames behave differently from wood.
Metal building insulation is the practice of slowing heat transfer through a steel-framed structure using batts, foam, or board products plus a vapor barrier.
Gather these before you start:
- Measuring tape, utility knife, and safety glasses
- Furring strips (wood or steel) and self-tapping screws
- Insulation product of choice (see Step 2)
Plan your electrical runs first. Once insulation goes in, adding outlets means cutting it back out.
Per the U.S. Department of Energy insulation guide, the right R-value depends on your climate zone, so check your zone before buying materials.
Step 2: Best Insulation for Metal Buildings: Comparing Your Options
The best insulation for metal buildings depends on your budget, climate, and whether you're building new or retrofitting. Each material solves a different problem.
| Option | R-Value per inch | Best For | Watch Out For |
|---|---|---|---|
| Fiberglass batts | ~3.0 | Budget builds, DIY | Loses R-value if damp; needs furring strips on steel |
| Rock wool | ~3.3 | Fire resistance, moisture | Costs more; heavier to handle |
| Closed-cell spray foam | ~6.5 | Max R-value, air sealing | Higher cost, pro install, limited DIY yield |
| Open-cell spray foam | ~3.6 | Interior walls, sound | Absorbs moisture; needs separate vapor barrier |
| Insulation board | ~4.0 | Retrofits, continuous layer | Seams need taping; can be brittle in cold |
Matching R-Value to Your Climate Zone
The U.S. Department of Energy maps the country into climate zones, and metal buildings generally need higher R-values than wood-frame homes in the same zone because steel conducts heat far faster. As a rule of thumb, ceilings need roughly R-30 to R-49 and walls roughly R-13 to R-21 in moderate zones, with higher targets in cold zones.
Rock Wool vs. Fiberglass Batts for Steel Frames
Rock wool wins on fire resistance and moisture tolerance; fiberglass wins on price and availability. For a steel frame, both need furring strips, since you can't staple into metal girts the way you would into wood studs. Rock wool also holds its shape better when slightly compressed, which matters around bracing and girts.
Closed-Cell vs. Open-Cell Spray Foam
Closed-cell foam gives a higher R-value per inch and acts as its own vapor barrier. Open-cell foam is softer, cheaper, and better at sound dampening, but it absorbs moisture, so you'll need a separate vapor barrier in humid climates. For most steel buildings, closed-cell is the safer pick where budget allows, but it's rigid and can hide leaks, so pressure-test plumbing before you spray.
The Metal-Specific Problem: Thermal Bridging and Condensation
Steel girts and purlins create continuous paths for heat to move between exterior and interior, an effect called thermal bridging. Even thick batts between girts lose effectiveness because heat bypasses the insulation through the steel itself; a continuous layer of rigid board or closed-cell foam over the girts breaks that path. Condensation is the second metal-specific issue: warm, moist interior air hitting cold steel forms droplets that rust the frame and soak insulation.
DIY vs. Professional Cost-Benefit Analysis
A structured way to decide is to compare cost per square foot of installed R-value. Fiberglass batts and rock wool are the lowest material cost but require the most labor to cut and fit around girts. Rigid board is mid-range and fast to install but needs careful seam taping. Spray foam costs the most but air-seals and insulates in one step.
Safety and Toxicity of DIY Spray Foam
Two-part spray foam kits contain isocyanates, which can cause skin, eye, and respiratory irritation. The CDC and OSHA recommend full PPE: nitrile gloves, eye protection, and a respirator with organic vapor cartridges. Kits must be used in well-ventilated spaces, never in an occupied building. If you have asthma or chemical sensitivity, hire a pro.
Climate-Specific Strategies
In hot, humid climates, the priority is keeping moist air away from cold interior surfaces, so a vapor barrier on the exterior side and closed-cell foam are common. In cold climates, the priority is R-value and air sealing, with the vapor barrier on the interior warm side. In mixed climates, a smart vapor retarder that changes permeability with humidity reduces risk in both seasons.
Step 3: Installing Furring Strips and Framing for Insulation
Furring strips create the cavity that holds your insulation and the surface you attach interior panels to. Without them, batts sag and thermal bridging through the steel girts wrecks your R-value.
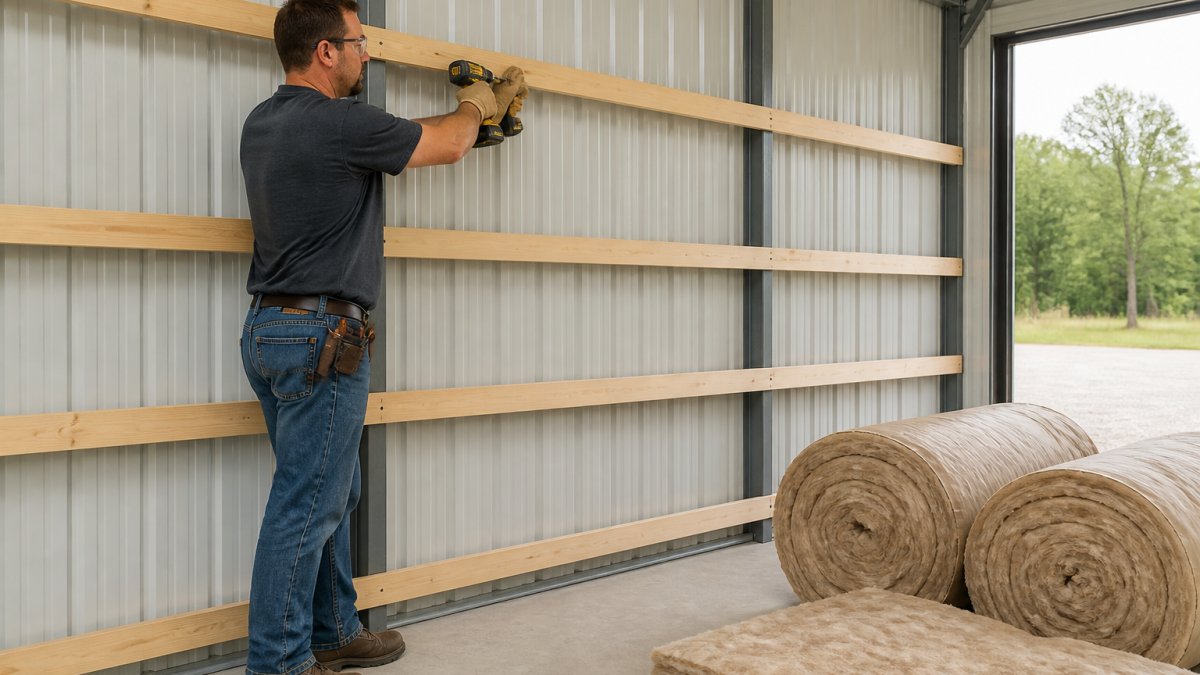
Here's the sequence:
- Mark horizontal lines on your steel girts at your chosen spacing.
- Attach furring strips with self-tapping screws, one every 12 to 16 inches.
- Check for square as you go, working from the bottom up.
- Leave a small gap at the base for moisture drainage.
Space your strips to match your insulation width. Standard batts come in common widths, so measure before you cut anything.
Step 4: Metal Building Vapor Barrier Requirements You Can't Skip
Metal building vapor barrier requirements come down to one rule: the barrier goes on the warm side of the insulation. Get that wrong and you trap moisture against cold steel, leading to rust and ruined insulation.
A vapor barrier is a thin sheet that blocks moisture from moving through your walls and roof. In most heating climates, install it on the interior face; in cooling-dominated climates, the guidance flips.
How Condensation Actually Works in a Steel Building
Condensation happens when a surface drops below the dew point of the surrounding air. In winter, interior air is warm and moist while the exterior steel is cold; without a vapor barrier on the warm side, moisture diffuses through the insulation and condenses on the steel. In summer, the reverse happens in humid climates: outdoor air is warm and moist, and air conditioning makes the interior steel cold.
Climate-Specific Vapor Barrier Placement
- Cold and mixed climates: Vapor barrier on the interior (warm) side. Use a material with low permeance, such as 6-mil polyethylene or foil-faced sheathing.
- Hot, humid climates: Vapor barrier on the exterior side, or use a vapor-permeable interior finish that lets the assembly dry inward. Closed-cell spray foam can serve as both insulation and vapor barrier in these zones.
- Mixed climates: A smart vapor retarder that changes permeability with humidity can reduce risk in both heating and cooling seasons.
Choosing the Right Material
Common vapor barrier materials include 6-mil polyethylene sheeting, foil-faced rigid foam, and vapor-retarder paints. Polyethylene is inexpensive but tears easily. Foil-faced products add a radiant barrier benefit but must be taped at every seam. Vapor-retarder paint is easiest to apply but has higher permeance and is best for mild climates.
Installation Details That Make or Break the Barrier
Tape every seam with foil-faced or butyl tape. A vapor barrier with gaps is barely a barrier at all. Seal around outlets, conduit, and penetrations with caulk or spray foam. Do not sandwich a vapor barrier between two impermeable layers, because that can trap moisture if a leak occurs. Leave a small gap at the base of walls for drainage, and never install a vapor barrier over wet insulation.
Retrofitting Vapor Barriers Without Removing Siding
For existing buildings, install a vapor barrier from the interior after adding furring strips and insulation. The barrier goes over the insulation, on the warm side, taped and sealed. This works for most retrofits, but if moisture is already trapped in the walls, address drainage and ventilation first.
Common Vapor Barrier Mistakes
- Installing the barrier on the wrong side of the insulation.
- Using duct tape instead of foil or butyl tape.
- Leaving gaps around outlets and penetrations.
For zone-specific guidance, check ASHRAE climate zone standards and the U.S. Department of Energy insulation guide.
Step 5: DIY Spray Foam Insulation Kits: What Works and What Doesn't
DIY spray foam insulation kits work well for small areas, rim joists, and sealing gaps. They fall short on full walls and ceilings. The two-part kits sold at hardware stores have limited yield and short pot lives once activated.
What they're good for:
- Sealing around penetrations and framed openings
- Filling small cavities and corners
- Touching up spots a pro crew missed
What they're not good for:
- Full-building coverage (you'd need dozens of kits)
- Consistent thickness across large surfaces
- Roof decks where fall protection matters
If your building is larger than a small shed, hire a pro for spray foam and save the DIY kits for detail work.
Step 6: Retrofitting Insulation Without Removing Siding
Retrofitting insulation without removing siding is possible and is the most common scenario for existing metal buildings. You work from the inside, so your exterior stays intact.
The approach:
- Attach furring strips to the interior face of your steel girts
- Install rigid insulation board between the strips for a continuous layer
- Fill remaining gaps with batt or spray foam
This method also cuts thermal bridging, since the furring strips break the direct path between interior and exterior steel. It takes more labor than a new build, but you avoid pulling siding.
Step 7: Common Mistakes to Avoid When You Insulate Metal Building Kits
Most insulation failures trace back to a handful of avoidable errors.
- No vapor barrier, or one on the wrong side. Moisture condenses on cold steel and rusts your frame.
- Compressing batts to fit. Squashing fiberglass cuts its R-value.
- Ignoring thermal bridging. Steel girts transfer heat straight through unless you add a continuous layer.
Climate changes the playbook. Humid regions need more attention to vapor control, while cold regions prioritize R-value and air sealing. Check ASHRAE climate zone standards for guidance specific to your area.
Conclusion: Planning Insulation Around Your Building Kit
Getting insulation right starts before the first batt goes up and depends on matching materials to your climate and building type. If you'd rather skip the guesswork, Metal Carport Depot LLC delivers engineer-certified steel structures with professional installation included across 37 states. Our 3D design tool gives you instant, state-specific pricing and helps you plan around local wind and snow loads.
Frequently Asked Questions
What is the best thing to insulate a metal building with?
Closed-cell spray foam delivers the highest R-value per inch and seals air leaks in one pass, which suits buildings that need tight moisture control. Fiberglass or rock wool batts between furring strips cost less and work well for workshops and storage where budget matters more than maximum thermal resistance. Many owners combine batt insulation on walls with spray foam at the roof line and corners, the spots where condensation and air leakage concentrate.
Do I need a vapor barrier in my metal building?
Yes, in most climate zones. Metal building vapor barrier requirements call for a continuous facing on the warm side of the insulation, which stops interior moisture from reaching cold steel panels and condensing there. Skipping it leads to dripping ceilings, rusted purlins, and soaked insulation that loses R-value. Use a facing with a perm rating suited to your climate and seal every seam with the manufacturer's tape.
Can I install spray foam insulation in a metal building myself?
DIY spray foam insulation kits work for small areas like rim joists, corners, and around doors, where a two-component kit reaches places batts cannot. For full walls and ceilings, the job gets expensive fast and demands full skin, eye, and respiratory protection because isocyanates in the mix are hazardous before they cure. Many owners handle the detail work themselves and bring in a professional rig for the broad surfaces.
How does insulation affect the energy efficiency of metal building kits?
Steel conducts heat roughly 400 times faster than wood, so an uninsulated kit turns every stud, girt, and purlin into a thermal bridge. Breaking those bridges with furring strips or a continuous insulation layer, then filling the cavities, keeps conditioned air inside and reduces HVAC runtime. The bigger gain comes from air sealing: stopping leakage around openings and seams often matters more than adding extra R-value.